Friday, January 14, 2011

Zipperphobia!

It could just be one of my little quirks but I hate putting zippers into clothing.  One of my favorite things about sewing for SASS is that there are no zippers needed.  That's right, I'd rather alter a pattern to require a plethora of buttons down the back of a dress than have to install a zipper.  When my brother asked me to fix the zipper on his favorite pair of pants, I told him to buy a new pair of pants.  Like I said...this could just be a quirk of mine but I'm sure there are other zipperphobics out there as well.

Anyhow, when I went to replace the bodice of this dress I found that the zipper was of great quality and that half it's length went down into the skirt-which I was not altering in any way.  I ended up leaving the zipper on and figured I could do a little tutorial showing how I did this.  This method could also be used if you need to make quick alterations to a dress without having to replace or remove the zipper. 

This is a very picture-centric post-remember you can click on any picture to see it in more detail.

The first step is to rip out the stitches connecting the bodice to the zipper.  Rip out the first 5 or 6 stitches down the skirt as well so that you will be able to keep the zipper out of the way when you sew the bodice back on to the skirt.

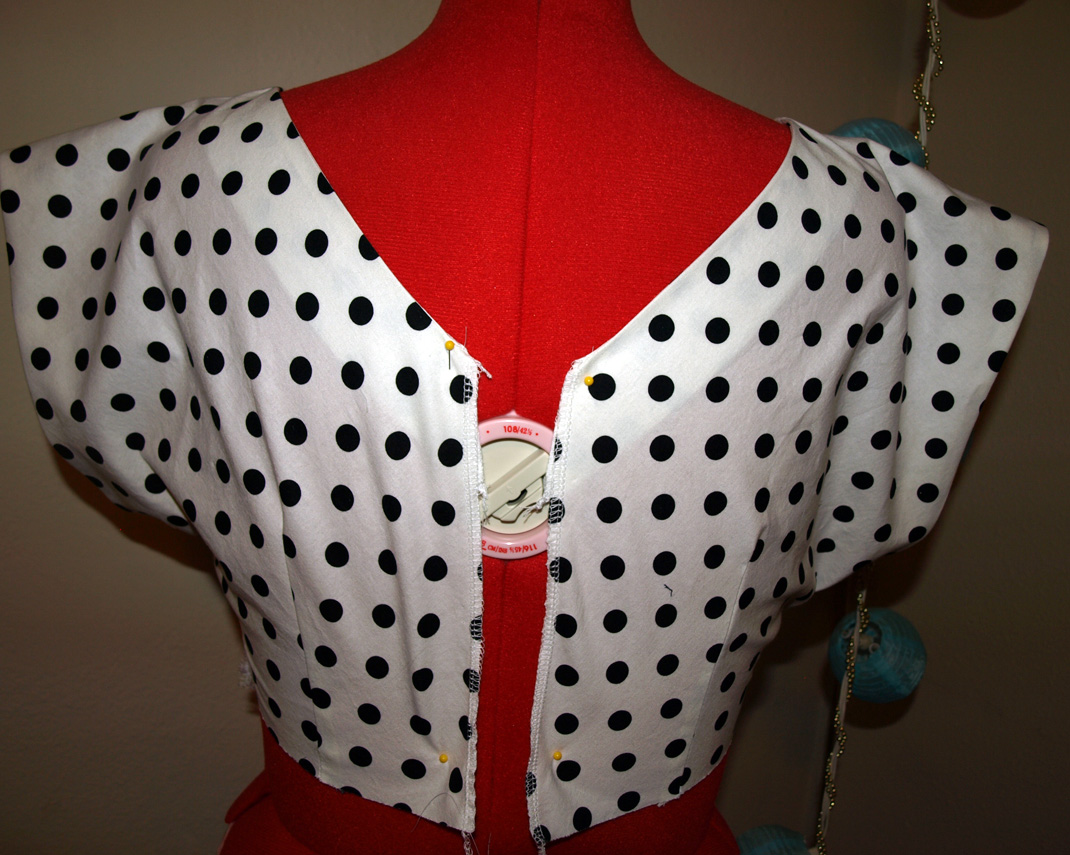
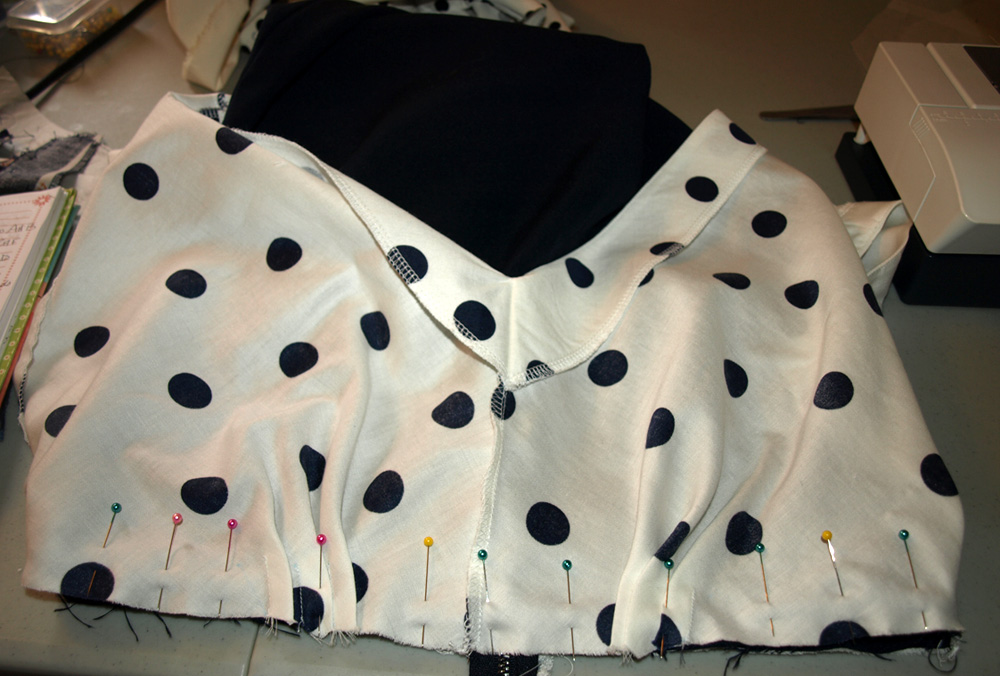
After completing the new bodice (with the back seam basted and pressed apart as you do with any zipper installation) pin the bodice to the skirt, right sides together with the bodice slipped down around the skirt.


Start the serged seam by beginning with an edge that will be attached to the zipper.  Fold the zipper down and make sure it is kept away from the seam.  After a few stitches, check to make sure that the fabric did not bunch or fold at the corner where you began, which would leave a kink along the zipper. 

Serge around the entire waistline.  Tie off and trim the ends of the thread on both sides.

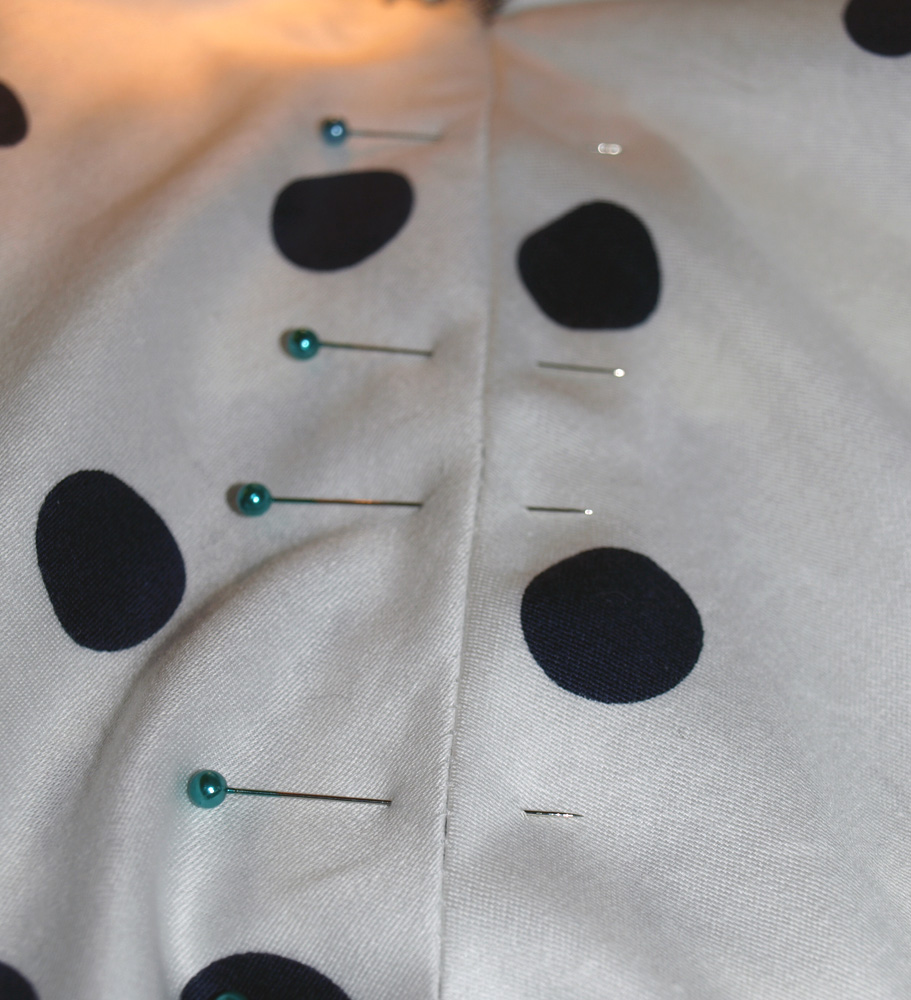
At this point, stitch along the waistline just inside the serged seam, making sure to catch the serger threads so they will not get stuck in the zipper.  As you can see in the picture on the right, the serger threads are caught in the second seam and pulled away from the zipper area.


Turn the entire dress inside out and press the seam allowances up towards the bodice.  Turn the dress right side out and press the waistline.  Steam is your friend!

Run the zipper up the inside of your basted back seam and pin it in place.  Sew the zipper on as you would regualarly.


After
Before

Pull your basting out with a seam ripper and you're done!


Tuesday, January 11, 2011

A hat for Thayer and Megan's dress finished!

I finally finished Megan's dress today.  I think it turned out pretty nice.  The zipper part proved to be the most difficult, just as I thought it would.

One of the reasons I started this blog was to do the occasional step-by-step project.  I plan on making one to show how I re-attached the bodice without having to put a new zipper in. 

I will have more pictures later and hopefully some pictures to post of Meg wearing the dress.  She's so much cuter than my dress form anyway.  :)

(By the way, the skirt did not get longer.  The dress form got shorter.)


I also finished Thayer's hat.  He'd specifically asked for the long tassle on the end, which was a shame because before I put the tassle on the hat stood straight up.  He looked like a little gnome.  It was so cute!

This is kind of the same pattern I used for the other two boys' hats but I kept getting lost because there were no solid stripes so I ended up pretty much just making it up as I went along after the first 20 rows or so.  I did a decreasing row every 5 rows.  I would guess this is where place markers would have come in handy but I do think it turned out a good size for a younger child.


Monday, January 10, 2011

Baby beanie

Here is the finished product of the baby beanie I made for Aidan's teacher.

It's so tiny and cute!  Almost cute enough to make me want another baby.  Almost.

I really did enjoy making this and I think I will make some for local hospitals in the future if I ever find myself without 15 other projects lined up in my head. 

I'm definitely going to have to expand on my knitting needle collection though.  Three sizes isn't going to cut it anymore.  

Saturday, January 8, 2011

This weekend's projects

Today I got the new fabric for Megan's dress.  I am so pleased with Denver Fabrics, not only for having the elusive navy polka dot fabric I've been trying to find for almost 2 months, but also for getting it to me so quickly. 
It's going through a pre-wash right now and then I have my work cut out for me (hehe, get it?) for the rest of the weekend.  I'm very happy with this fabric, it's a good quality and the subtle sheen to it looks great against the dark skirt-as you can see.

Of course there will be plenty of pictures in the next day or two as I finish up Megan's dress.  I'm excited!


 I also have a hat I am knitting this weekend.  Aidan's teacher is due to have her first baby in a week and her last day at school is Monday so Aidan asked me yesterday to make a  hat for her baby.  Last minute requests are par for the course with Aidan but that's ok because the pattern I am using is so simple and fast.  In fact, I am considering using it to make more newborn beanies to donate to hospitals in the area.  I think that would be a fun and easy little project.

As you can see I'm almost done with this one and I suspect it would go even quicker if I had the right needles.  Yes, I am knitting this on a pair of double pointed needles with rubber bands on the ends.  I just didn't have the right size in regular needles and didn't have time to go buy some since this is so last minute.  Hey, ghetto needles for the win right?  Either way, it should be a cute hat and was a fun, small project using only the basic ribbing and stockinette stitches.  I would highly recommend this project for someone new to knitting. 
I found the pattern on a website called Touching Little Lives.


Last but not least I started Thayer's stocking hat hat while waiting for the polka dot fabric to be delivered.  I'll finish it up after the dress is done but I am pleased with this hat because I taught myself a new stitch. 
It is the seed stitch or moss stitch (the bumpy looking stripe in the middle) and was actually pretty cool to see as I got further along.  It was simple and easy to  learn and I really like how it looks.  If I measured right the seed stitch portion of the hat should be around the widest part of his head just before the hat droops down in back.  The yarn colors wouldn't have been my first choice but he insisted...so the hat looks kind of like a black and white calico cat.  What a surprise, considering it was chosen by Thayer the Cat Boy.

So, crazy project weekend for me!  Amazingly I somehow have a clean house too.  I don't know how it happened but I'm not about to question miracles.

Tuesday, January 4, 2011

How to replace a bodice-Part II

Today I put the bodice back together for Megan's dress.  I was actually very happy with how easily it went together.  Especially since I went through such miracles as not running out of bobbin thread, not breaking any needles and not screwing up my serger tension.  Amazing!

However, the more I worked with the fabric the less I liked it.  What I had thought was a "dark navy/almost black" polka dot is looking more and more like a "black/totally black!" polka dot.  Especially after seeing it in sunlight coming in the front window while I was sewing.  Maybe I should carry bolts of fabric out into the sunlight before buying them from now on...hmmmm.....
 
 So again I searched every fabric store I could find online with very little luck-it seemed like everything that was the right color was just not the right fabric-it'd be too gauzy or a jersey knit or something else that would not match the style of the dress.

But I finally found a fabric that is NOT "almost black," it's definitely a navy dot and it's sateen shirting, which I think will work fabulously with the skirt.  I guess this makes the "almost black" dots my mockup, which is funny because I never make a mockup.  I'm just frankly too lazy for it.  I'd rather spend 20 minutes with a seam ripper. ;)

Aside from realizing that I need to cut down on the seam allowance bulk at the center front I have no other issues with how the bodice went together.  I hope to be able to convert this bodice into a blouse for Megan though, no sense in wasting it.

And hey, check out those darts and tucks!  Niiiiiccee!  Like I said, it was a day of miracles. 

Sunday, January 2, 2011

A hat for James

I finished James' stocking cap last night.  He wanted the same one I made for Aidan but shorter.

I used this stocking cap pattern, which was VERY easy to follow and, always a bonus, free too!

A few things about this pattern:  there is a typo in it:  it should read "cast on 76 stitches" not 78.  When doing ribbing you must have a number of stitches that can be divided by 4.  Also, it says stockinette stitch after the ribbing however, I read that if you are working on circular needles you can just do regular knitting (garter stitching) in place of stockinette.  I find this much easier to keep a rhythm going, especially if I'm doing something else at the same time because I don't have to keep track of whether I am knitting or purling.


To alter the pattern for this shorter hat I followed the pattern up to round 10, figuring that if I'd started to alter it before then it probably wouldn't have fit on James' head.  This seemed to work out well.  After round 10 I did even garter stitching for 10 rounds (instead of 20) and at every point after that I did 4 rounds wherever it said to do 19 so I was decreasing with the first round each time I changed colors.

Also, this time I used the duplicate stitch join in with a slipknot instead of a regular knot then went back and worked in the tails after a few rows.  The slipknot made this so much easier and working the tails in as I went along meant that when I was done with the hat I was actually DONE without having to go back and do clean-up.  This may seem obvious to seasoned knitters but if you are new to it like me, it's not so obvious. 

There is a fabulous video for the duplicate knit join-in using slipknots at Knitting Tips about halfway down the page.

Both Aidan and James' hats were made with Red Heart worsted weight yarn.  The larger hat used about half a skein of each color.  The smaller hat used about 1/4 skein of each color. 
I used 16" size 8 circular needles and size 8 double pointed needles on this.  (You will need both, as you move the work onto the double pointed needles when it gets too small for the circular needles.)  I also used a plastic tapestry needle for the color join-in's. 

To save you from the "bigger is better" mistake I made when buying circular needles, you do need to get the smallest length you can for your project.  For instance, this project says to use 16" circular needles.  I couldn't find them the first time I went shopping and bought 24" (I think...) needles.  Silly me, you cannot knit something on a circular needle that has a bigger diameter than what you are making.   (Unless you use a technique called magic loop knitting.  I did try this technique and almost tore my hair out in frustration.  I do not recommend trying it as a beginner but I hear that some people actually prefer it so...to each her own, I guess.)


All of the materials for this hat probably cost a total of around $10 using Joanns or Michael's coupons that come in their weekly ads or emails for the needles.  I encourage anyone who wishes they could knit to just jump in and do it.  After all, if you mess up you can always just pull it out and try again! 


Friday, December 31, 2010

Project notebook

If you're like me you find yourself "accidentally" in a fabric or craft store quite often.  Usually I'll end up finding something that I know would go great with a project I want to do but I don't know how much of the fabric I'll need or if the trim I found will match what I'm working on.

This is where my project notebook comes in handy.  It's small enough to keep in my purse and  I write the pattern or project idea at the top of the page and on that page I will keep track of fabrics or trims I've picked out, what color thread I'm using, etc.  Any information that would come in handy should I "accidentally" find myself in a fabric store looking at something I think would go great with whatever I'm working on at the time.

On the inside front cover I have my own measurements, as well as those of people I sew frequently for.  On the inside back cover I have the phone numbers of local fabric and craft stores, which has proven to be handy if I'm out and need to check their inventory or hours.

You can see in the picture, the left page has ideas for what I can use to make one of my son's Halloween costumes.  The right page is a prairie dress I made for shooting.  I used Gutermann thread on that dress and so just have the color written at the bottom of the page.  However, if I use a thread that has stickers on the ends I will put that sticker on the page along with the fabric swatches.

I have also created a page of swatches of my stash fabrics so that if I come across trim I like I can see if it matches anything I already have in my stash.

Thursday, December 30, 2010

My next shooting outfit

This dress has been bouncing around the back of my head since I saw this picture over a year ago.  I am promising myself that it will be my next shooting outfit, hopefully to be done in time for 5 Dogs Creek at the end of April.

Here is my inspiration for the dress, by This Years Girl-I really love her art.
I will most likely make 3/4 length fitted sleeves in the same color as the bodice instead of a white undershirt.  The maroon and black are so pretty together but my shooting boots and rig are brown so I may end up choosing a different color combination.  I must match!  If I go with a brown bodice I may make the underskirt teal or lavender.  We will see...

How to replace a bodice...

Hopefully this won't turn into "How NOT to replace a bodice!"


My friend Megan has asked me to replace the bodice of a dress after what looks like a mishap with a blue marker at the dry cleaners.  I want to document this particular project as it is one of the most challenging I've had in a long time.  


So...here is the original dress.  The bodice will be replaced with a polka dot print, seen here alongside the original skirt of the dress, which will remain the same.  My first step was to take about 75 pictures of different angles, from the inside and outside of the dress, along with taking measurements of the entire dress...every seam, every dart and tuck, every edge.  Lots of pictures...
Then I began ripping out seams-taking pictures along the way.  I removed the bodice from the zipper and took apart the right side, leaving the left side intact as something to refer to should my pictures (now around 200 of them-paranoid anyone??) fail me.  All pieces were labeled and ironed.
I then traced the pieces onto tracing paper and cut out the new fabric.   Next is to sew the bodice back together.  Ironically, I was completely freaking out on this project and terrified that I couldn't handle it until I had gotten to the point of having the right side of the bodice almost completely apart.  
Only at that point did I realize how simple the design is and that I'd done much more difficult things before.  I think my biggest worry on this dress is just going to be figuring out how to complete the zipper portion without completely removing the zipper from the skirt and starting from scratch.  Overall though, I am quite pleased with how this is looking so far.  


And because I've found that I must ALWAYS have a side-project to go to when I feel like cutting my main project to shreds, I am working on another stocking cap, this time for James.  He wants it about half as long as Aidan's was and in blue and green instead of Christmas colors.  I am MUCH happier with the uniformity of my ribbing around the crown this time. 


Can I knit? I mean...I can knit!

I'd have to say my favorite craft is sewing.  I find that as someone who is not too keen on following what's in style at the moment, it is easier if I can make something myself exactly how I want it.  This started out with me being able to let my kids be anything they want for Halloween instead of being limited by the boring selection of craptastic costumes in stores.

One of the main reasons I started sewing more seriously was to lower the cost of costuming for my SASS habit.  After watching my mom whip out a crocheted shawl in two days for me to wear to a match I realized that I could use that skill for quite a few of my shooting outfits.  Also...yarn is CHEAP!! This is always a good thing, as it is actually rare for me to have a stash of fabric waiting to be sewn.

I started out by buying a skein of cheap multi-colored yarn and a set of straight size 10 needles.  I went a-Googling for knitting videos and found Knitting Help the very best, and easiest to understand, source for videos to teach myself.  I have yet to buy a book, I've taught myself so far just with the videos on that site and using free patterns found online.  The internet is a wonderful thing!

I spent the first several days making fingerless gloves to figure out my tension, how to hold the yarn and needles and how to read patterns.  Then jumped into my first big project, a long stocking cap for Aidan in Christmas colors.
Aside from some tension issues in the ribbing portion, I am quite happy with how it turned out.  Lesson learned this time:  do NOT wait until the end to work in the tails of each color change!  That was torture!

I plan on figuring crocheting out in the future as well but since my mom did teach me how to crochet when I was in my teens, I am hoping that it will come back to me quickly when I find something I want to crochet.